Activation Manual
Our Licensing System
Plugin Alliance products use a proprietary licensing system that is completely software based. No hardware license dongle, special drivers, or serial numbers are required to run any of our plugins. Everything is handled from within the software product. All of your licenses are stored in a single file located on your computer or USB flash drive. This file must be updated whenever you buy or start a trail for a new Plugin Alliance product.
We offer both online and offline activation. We highly recommend using online activation. It is the fastest and easiest process. Activation requires you to have a current Plugin Alliance account. If you don’t already have one, you can create an account on our website for free.
License Types
Our licensing system includes different types of licenses that come with related restrictions on their use.
A full license unlocks a plugin for an unlimited amount of time. You get a full license whenever you purchase a new plugin from our website. These licenses can be activated on up to 3 devices. If you want to use more devices, you can purchase additional licenses to add 3 more devices with each license.
A trial license allows you to try a product for 14 days. Trial licenses are free of charge and fully-functional, so you can use all the features of the plugin. A trial license can be activated on up to 99 devices, but it will only be active for 14 days after the first activation.
Lease licenses are licenses which are valid for a specific period of time. The duration of your validity period depends on the product you have purchased and is usually shown as a countdown value in the lower toolbar of the plugin. If you have extended this period, e.g. through a purchase, you may need to re-activate to refresh your license file. This will extend the activation period so you can continue using the plugin. Subscription licenses are Lease licenses. Subscription payments are handled automatically by our system. However, you will need to re-activate the plugin according to your subscription period.
You may also have an NFR license in your account. These license are given out with certain promotions. They may have an expiration date or be unlimited and they cannot be transferred.
Installation
Installation Manager
The Installation Manager is the most convenient way to download and install Plugin Alliance products. By simply downloading and installing the Installation Manager, you can browse all the plugins available from Plugin Alliance and select the ones you want in the formats you need. What you need, when you need it, a custom installer is created for your system, quickly and easily. Whether you’re using AAX, VST, VST3, AU, the Installation Manager gives you the power to pick and choose from all available plugins before installing directly on your computer-based audio workstation, or transferring to a dedicated offline machine.
To begin, download the Installation Manager for your system (MacOS or Windows) from the Installation Manager page on our website. Then extract the zip file and drag the resulting app to your Applications folder (MacOS) or Program Files folder (Windows).
If you want to install plugins on an offline computer, you can still use the Installation Manager. See the instructions below.
Online Installation
If your audio workstation has an internet connection, use the Installation Manager on that computer and select the Download/Install installation type in the sidebar.
You can select the plugin formats at the bottom left to filter the list of plugins so that only those supporting your selected formats will appear. This will also determine which formats are downloaded and installed, so you can save time and hard drive space by excluding formats that you don’t need.
Select the plugins that you want to install and click the Download & Install button at the bottom right. The progress of your download will be displayed. When it’s complete, click the Install button and your plugins will be available to use in any DAW that supports the formats you selected.
Offline Installation on a Computer
To install plugins on a computer without an internet connection, you’ll first need access to an internet-connected computer to download and create an installation package. On the online computer, run the Installation Manager and select the Download/Export option in the sidebar. The platform options will appear: Mac, Windows 64-bit, Windows 32-bit. Select the platform of your offline device.
You can select the plugin formats at the bottom left to filter the list of plugins so that only those supporting your selected formats will appear. This will also determine which formats are downloaded and installed, so you can save time and hard drive space by excluding formats that you don’t need.
Select the plugins that you want to install and click the Download & Export button at the bottom right. The progress of your download will be displayed. When it’s complete, click the Save As button to choose a removable drive on which to save the install package. It will be named Installer.pabundle by default, but you can rename it to keep multiple packages organized. Also be sure to copy the Installation Manager app to your removable drive, as you will also need that app to install the package.
With a copy of the Installation Manager app and your installer package, take the removable drive to your offline computer. Copy the Installation Manager to your Applications folder (MacOS) or Program Files folder (Windows), then run it. In the sidebar, select the Import/Install option, then click the Import button on the lower right and select the install package. The Installation Manager will verify the package and an Install button will appear if the file is loaded and ready to go. Click the button to install all the plugins in the package on your offline device.
Standalone Installers
Most of our plugins still have traditional standalone installers available. You can find these installers on the product page on our website, or on the Manage Registered Plugins page in your account. The same installer allows you to start a trial or use a full license that you’ve already purchased. We offer separate installers for each platform: Windows, MacOS.
After you have downloaded the installer for your platform, you can run it to select the plugin formats that you want to install (for example VST, AAX, or AU). The format you need depends on the digital audio workstation (DAW) that you are using. If you are unsure of which format your DAW requires, refer to the DAW software documentation.
Activation
After you’ve installed your plugins, start your digital audio workstation (DAW) software. Most DAWs will wait until you instantiate a new plugin in a session before starting the activation process. In Pro Tools, a new plugin will produce the activation window during the plugin scan at startup. Pro Tools will incorrectly report that a plugin is invalid if you don’t complete the activation process at startup.
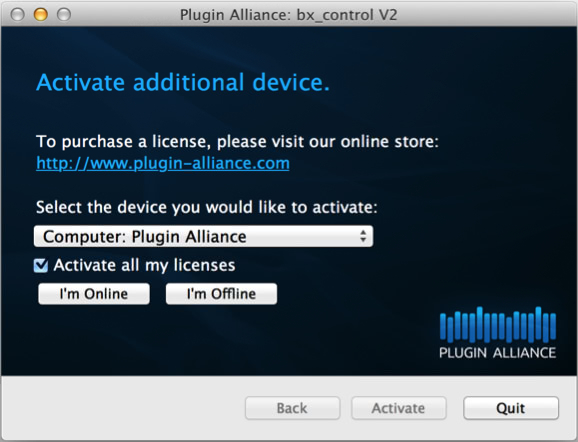
Click on the Activation Required text in the plugin window to open the activation window. You’ll see a drop-down menu that lets you choose which device to activate. Your options will be your computer or any connected USB drives (see USB Activation below). Selecting Activate all my licenses will activate your system on all the available, valid licenses in your account. If there were any problems with plugin activation, a message will describe the reason (such as not having enough available machines on the license).
Because all our plugins use the same license file, there is no need to reactivate the same plugin in different DAWs. For example, if you activate the bx_digital V3 in Pro Tools, it will also be active in Logic, as long as you are logged in to the same user account on the same computer or using the same USB flash drive.
In addition, if you log in to a different Plugin Alliance account when activating a plugin, this will replace your license file. Only the plugins that are active in this new account can be used.
Online Activation
If you chose I’m online in the activation window, you can enter your Plugin Alliance account email address and password to connect to our server and get the current version of your license file automatically. The account you use here is the same one that you use to log in to our website.
You can choose to save your log in by selecting the Save password checkbox (Fig. 2). Your log in details are encrypted for security and can be used to activate new plugins in the future without having to re-enter your log in data every time.

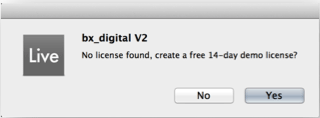
Any Plugin Alliance products on your system for which you have a valid license will be activated; otherwise, if you haven’t started a trial before, you will have the option to start one (Fig. 3). The 14-day trial period starts as soon as you activate the plugin.
First-time Offline Activation
If your audio computer is not online, the plugin activation must be done manually via another computer with internet access. Then, you can copy your license file from the online computer to the offline one.
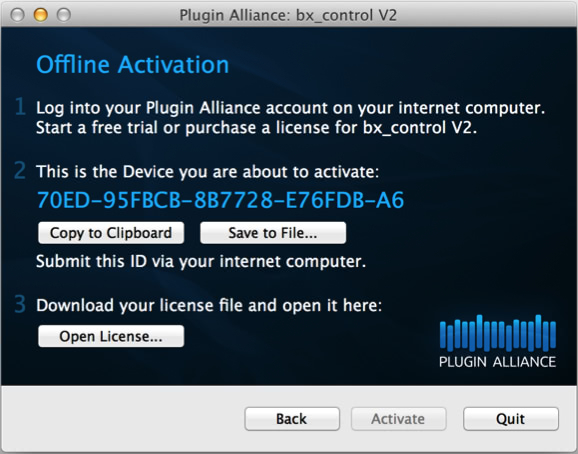
In this case, choose I’m offline in the activation window. Choose Save to file and save the text file (Fig. 4), named machine_id.txt on a removable drive. Now take the drive to your online computer and connect it.
Log in to your Plugin Alliance account and make sure you have an active license for the plugin you want to activate in your account. If you want to start a trial for a new plugin or activate a free plugin for the first time, go to the Create Offline License page, select the plugins you want, and click Create License. Visit the Manage Devices page, upload the machine_id.txt file in the Activate New Device section (Fig. 5), and click Activate.
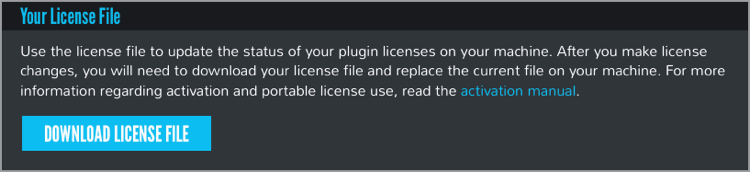
Download the license file from the Download License File section at the bottom of the Manage Devices page to your removable drive (Fig. 6). Take the drive back to your offline computer.

In the plugin activation window, click Open license and choose the pa.license file from your removable drive (Fig. 4). Finally, click Activate and your plugins will be available to start using.
Offline Activation for Existing Devices
Each offline computer only needs to be registered once in your Plugin Alliance account. To activate a new plugin on a device that is already registered, you can begin on the online computer and skip copying the machine_id.txt file.
To activate one plugin, go to the Manage Registered Plugins page in your account. Select the plugin, and then select your computer in the drop-down menu under Activate Existing Device and click Activate (Fig. 7). Download the license file from the Download License File section at the bottom of the page and save it on a removable drive (Fig. 6). Take the drive to your offline computer.
To activate all your plugins at once, you can use the Manage Devices page instead (Fig. 7). Download the license file from the Download License File section at the bottom of the page and save it on a removable drive (Fig. 6). Take the drive back to your offline computer.

On the offline computer, open the plugin activation window, click I’m offline, then Open license and choose the pa.license file from your removable drive (Fig. 4). Finally, click Activate and your plugins will be available to start using.
USB Activation
Our plugins are portable when you activate them using an ordinary USB flash drive. With this flash drive, you can run your plugins on any computer without the need for the computer to be activated. This is especially useful for front-of-house engineers on tour, or engineers who travel to different studios frequently. We highly recommend activating a USB flash drive via an online computer.
Insert the flash drive and make sure that it is mounted in your file system. On an online computer with your plugins installed, open a plugin in your DAW. Open the activation window by clicking the key icon at the bottom right if it’s not open already. Select your flash drive in the drop-down menu under Select the device you would like to activate, then click I’m online. Enter your Plugin Alliance account email address and password. The account you use here is the same one that you use to log in to our website. Click Activate to connect to our server and save the current version of your license file to your flash drive. Now your plugins can be used on any computer just by plugging in this flash drive.
Some very old flash drives are unsupported and won’t appear in your device drop-down. If your USB flash drive is among the unsupported models, please switch to a newer drive.
Deactivation
Each of your full license can be active on 3 devices at once. It’s easy to move your licenses from a machine you no longer use to a new one. You can even reclaim a license from a computer or flash drive that is lost or broken. All of your license data is stored on our servers, so you don’t need to worry about losing a license on a crashed hard drive.
Log in to your Plugin Alliance account and go to Manage Devices. In the Activated Devices section, find the name of the device that you want to reclaim, then click the Deactivate button. Trial licenses cannot be reclaimed, but that shouldn’t be a problem since they come with 99 available machines.
Since your license data is stored remotely, there is no need to deactivate a computer or flash drive when you reformat it. Our licensing system will recognize the same machine ID as long as there were no other hardware changes and reuse the existing activation for the device.
Due to the way Windows generates the machine ID, certain hardware modifications may change your computer’s machine ID. If this happens, you can use the process above to deactivate the old machine ID, then activate the new one using online or offline activation as needed. You may also consider using USB Activation instead if this happens often on your Windows PC.
Please note that you can’t reclaim the same plugin license from more than seven different machines, but if the same machine is deactivated more than once, it will not be counted again. So if you frequently need to move your licenses to new computers, please consider using a flash drive as one of your three devices (see USB Activation).
Plugin Licensing Toolbar
Plugin Alliance products have a toolbar (Fig. 8) below their user interface, giving you access to some basic plugin information, described below.

PA Logo: Clicking the Plugin Alliance logo takes you to the Plugin Alliance website via your web browser if your computer is online.
License Type: The center of the toolbar shows the type of license you’re running. Licenses with an expiration date will show the number of days until they expire.
$ Icon: If you have a trial or financed license for a plugin, the dollar sign icon will take you to our website, where you can purchase a full license or make your next payment.
Key Icon: The key icon opens the activation window, allowing you to refresh your license file with device changes you made on our website, activate a newly purchased or extended trial, or activate a flash drive connected to your computer.
? Icon: The question mark icon contains a context menu that links to the product page and downloads section on our website.